Surveying and Navigation with Waypoints and Paths
The GPS Waypoints is a multi-sector surveying tool for professional and personal purposes. This is the part 2 of the user guide, which is composed of 4 parts, aiming to describe the installation, configuration, surveying and mapping functionalities of the product.
Part3: Surveying with Waypoints and Paths
- Waypoints
- Surveying
- Basic surveying with export
- Surveying with multi-acquisitions
- Thematic surveying with tagging (qualification tags and numeric tags)
- Thematic surveying with automatic tagging (shortcut keys)
- Thematic surveying with photos
- Analysis
- Manage surveying Points with exports to multiple formats
- Sort and export the closest Points
- Navigation
- Find a place from a saved Point
- Find a place from a manually added Point
- Field check for insitu observation and validation
- Surveying
- Paths: Tracks, Routes and Areas
- Surveying
- Manual Path surveying
- Activity tracking trigger by time and distance (Auto Path)
- Areas surveying
- Analysis
- Analyze Paths in time with line charts
- Import Paths/Route from waypoints
- Export Paths and Polygons
- Navigation
- Follow a route
- Surveying
[ Index ] [ Part 1 Configuration ] [ Part 2 Location and Status ] [ Part 3 Waypoints and Paths ] [ Part 4 Maps ]
Waypoints surveying
Basic surveying with data export: you can acquire Points on the field during a surveying activity and build a business or a personal geographic database. The mapping points collected can be exported and shared to other applications (e.g. Dropbox/Google Drive). The Share option is more convenient and popular since the Export option will require access to your device’s internal storage, typically on the folder “/Download/gps-wpts”. Finally, after getting the exported data, you may view and process it with any geo-spatial tool, such as Google Earth for the general consumers.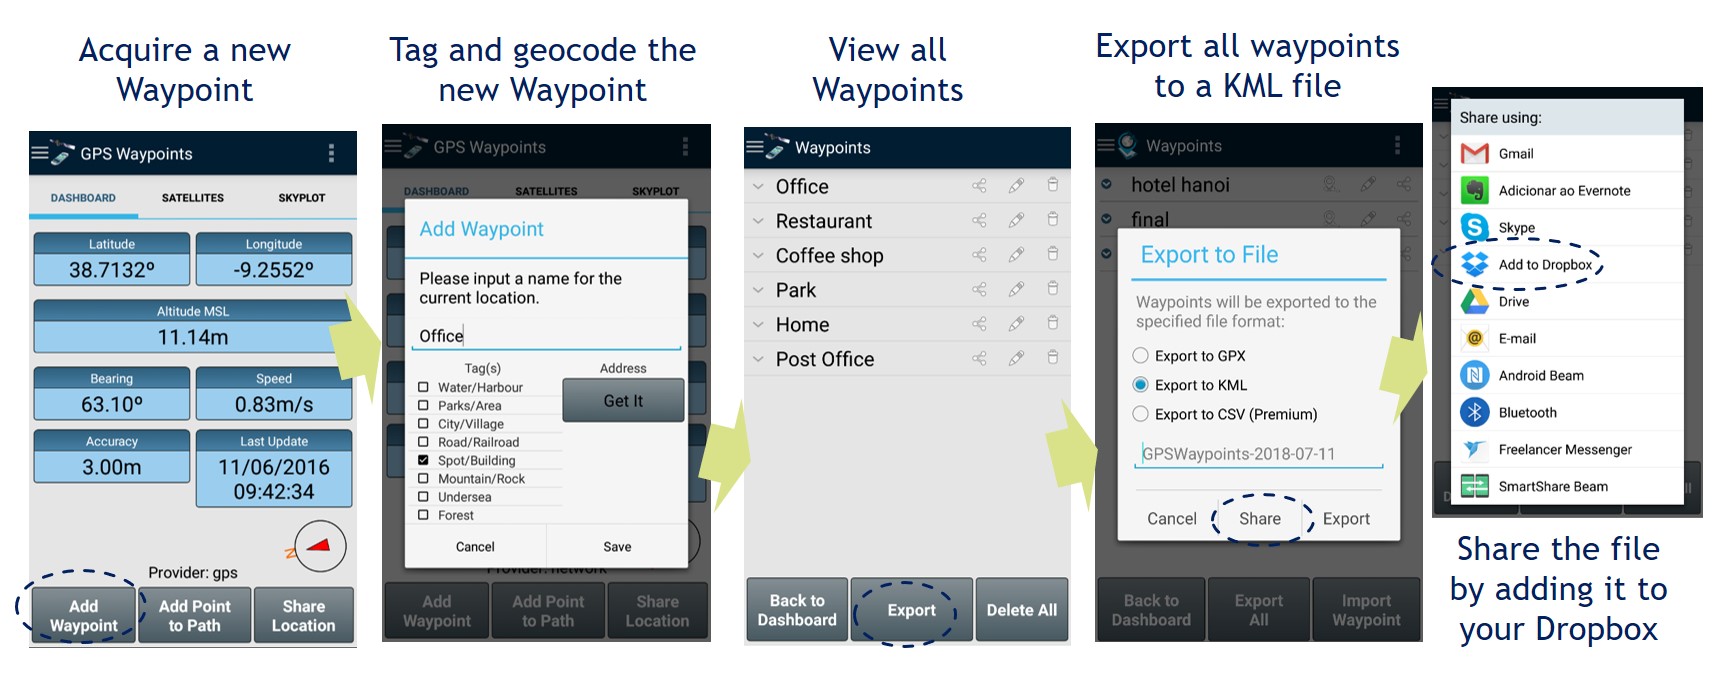
Surveying Points with multi-acquisitions: obtain better accuracies by making multiple measurements of the same Point. Just long press the “Add a waypoint” button in order to start getting measurements. Then use the averaging or best accuracy method and after reaching enough measurements press ‘Continue’ to get your Point location enhanced.

Thematic surveying with tagging is an activity in which Points are collected and classified using tags from specialized themes, such as cartography, environment, and urban planning. New themes can be loaded from our remote site or customized with specific data through the Tags view. After defining the appropriate thematic data model, Points are classified using the defined tags and can then be exported—together with all associated metadata—to various file formats, including KML, CSV, and GPX. 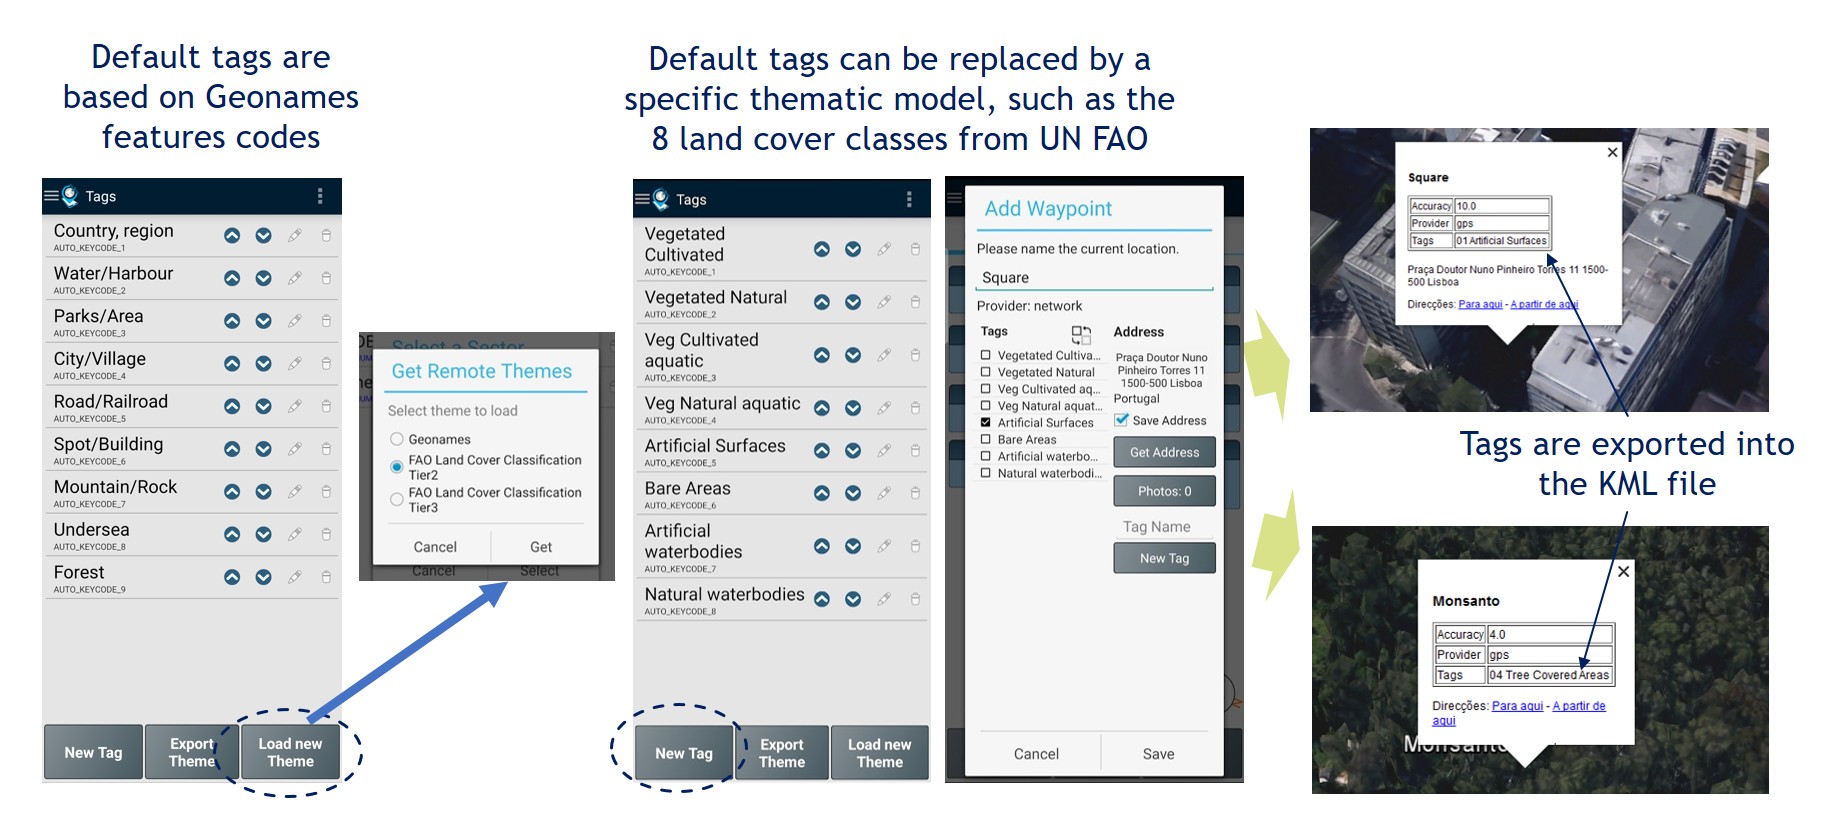
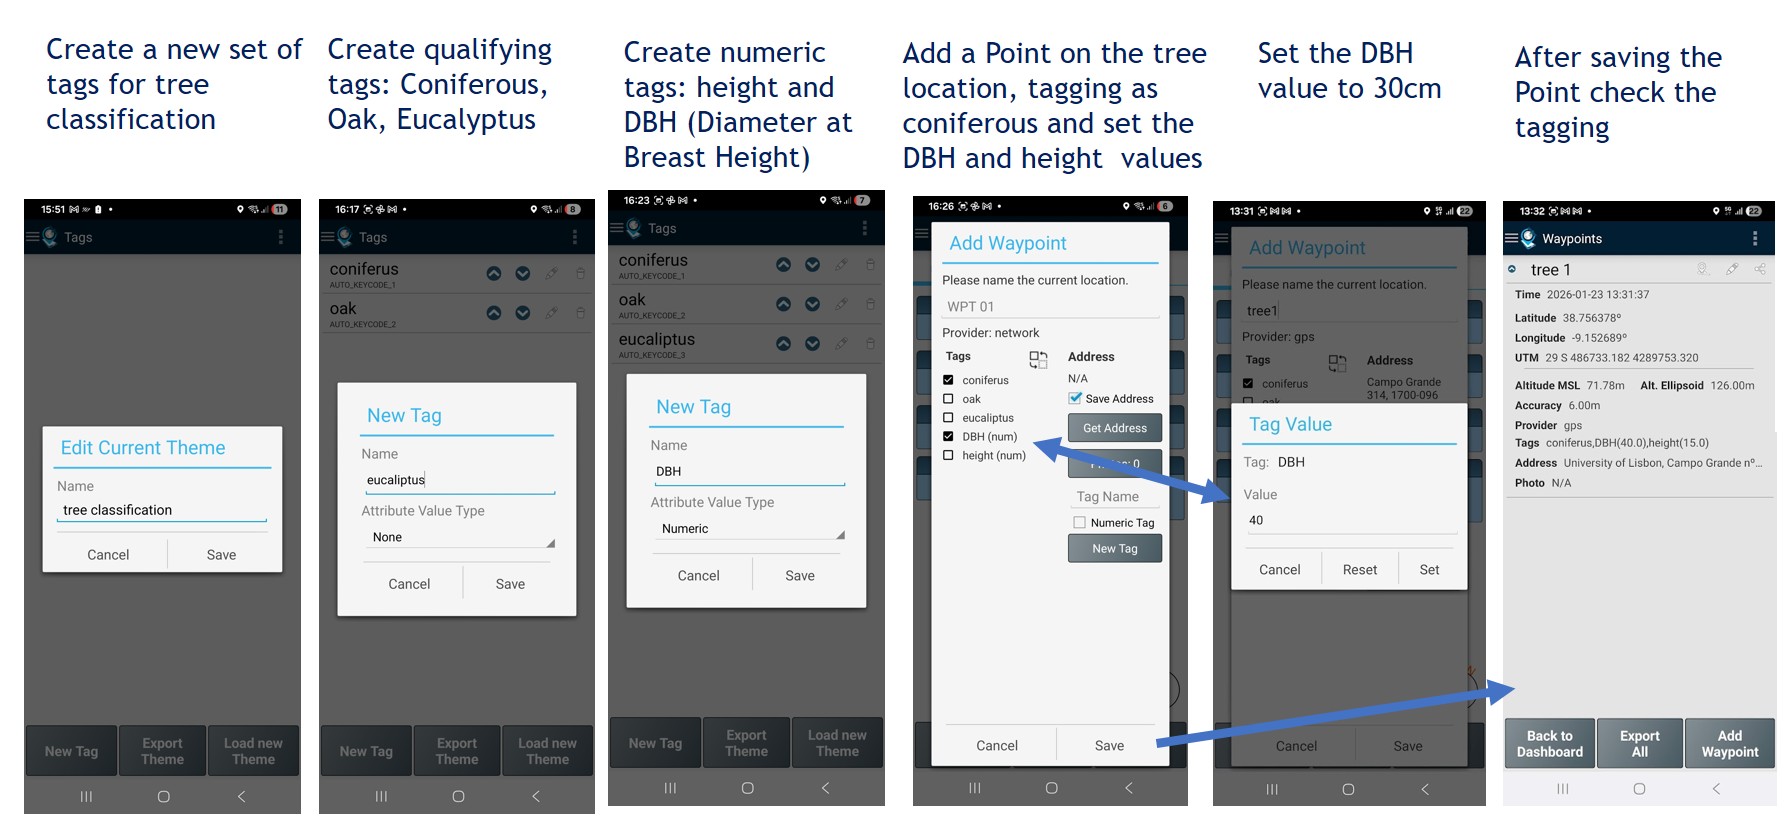
Thematic surveying with numeric tagging: start by creating a custom theme by deleting all existing tags and renaming the current theme. Next, create the qualifying tags (for example, tree types such as Coniferous, Oak, and Eucalyptus) and the numeric tags to quantify specific metrics (such as DBH and tree height). When adding a Point, set the numeric values for the tags (for example, DBH = 40 cm and height = 15 meters). Save the Point and verify its values.
Thematic surveying with automatic tagging (shortcut keys): In Premium mode, it is possible to use an external keyboard and assign shortcut keys to automate the Waypoints surveying activities.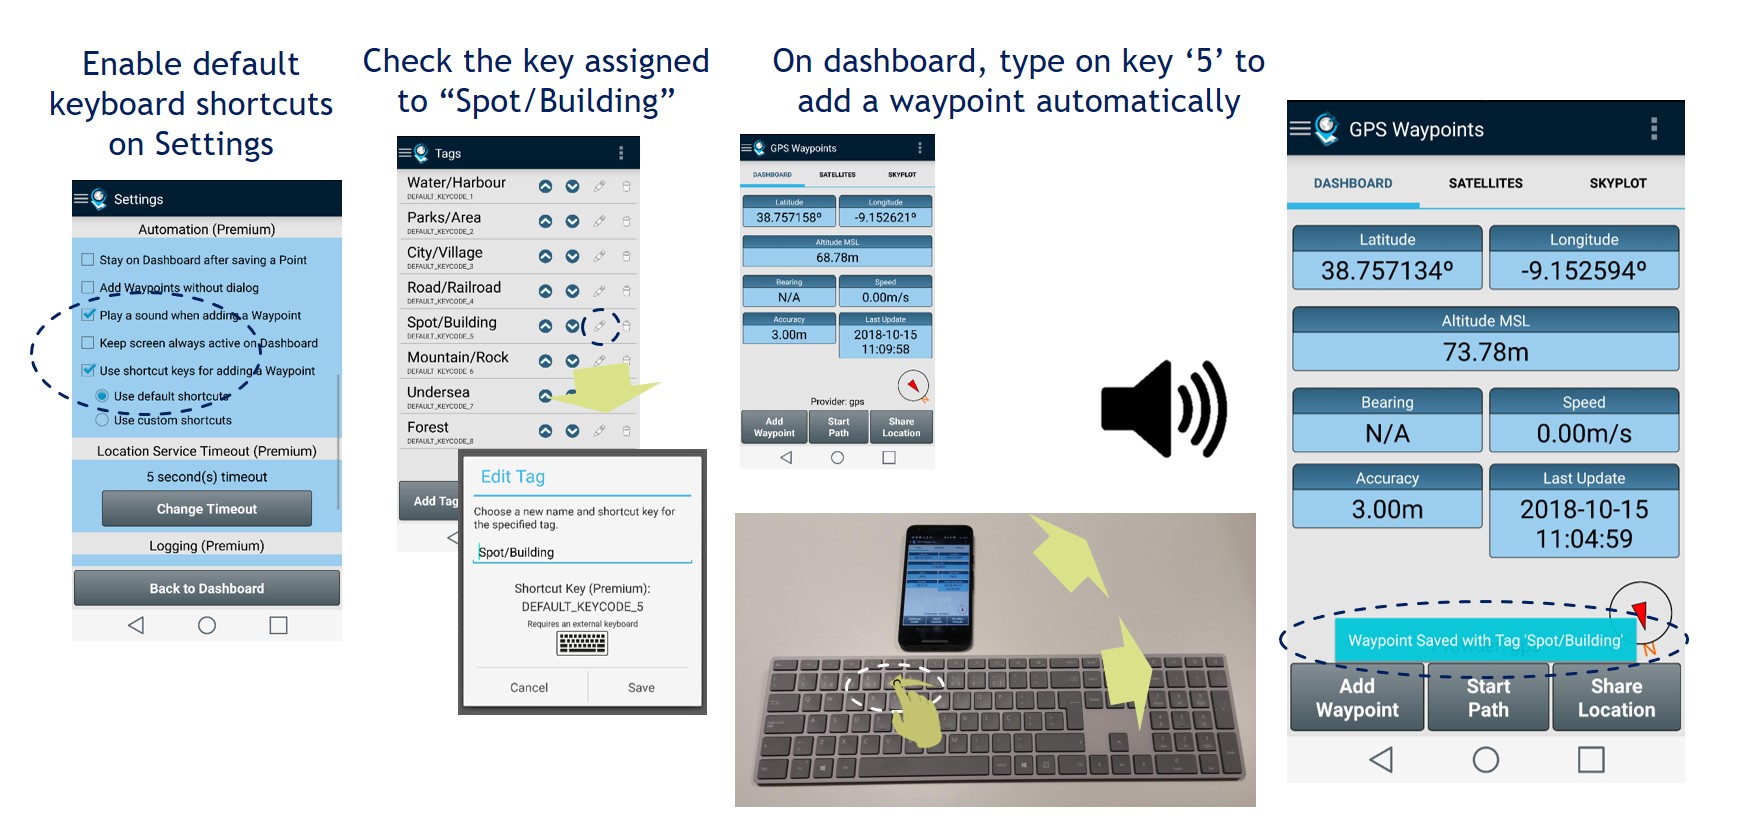
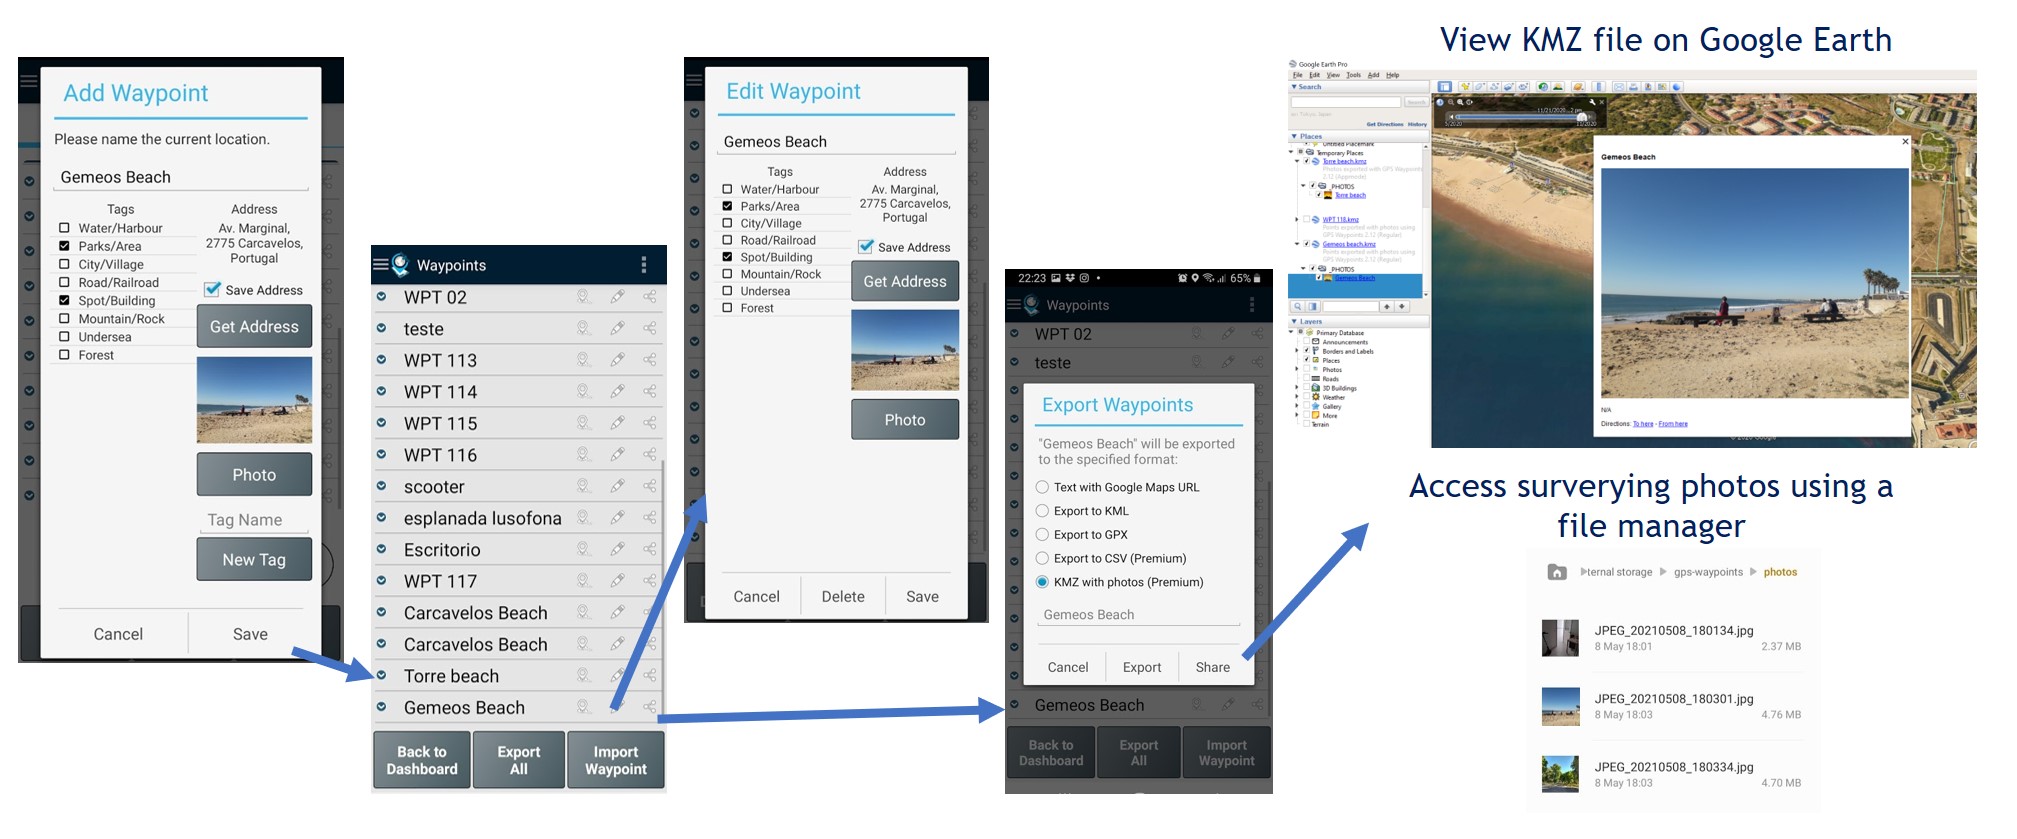
Thematic surveying with photos: allows collecting Points and characterized them with photos (one photo per point). The photos are saved in local storage. They can be exported to KMZ file format (points with embedded pictures) or be accessible using a file manager.
Waypoints analysis
Manage surveying Points with export to multiple formats: you can manage all saved Points on the Waypoints view, including list, view details, edit and export to various geographical formats . The following three Export options are available by selecting a single Point or multi Points: Share the Points data through a URL, Share via messaging application (e.g. email) the exported file and Export file to a local folder. Export and Share the Points’ locations with others are useful in multiple situations, such as check out the Point/Issue/Spot I found, edit on other GIS tools, etc…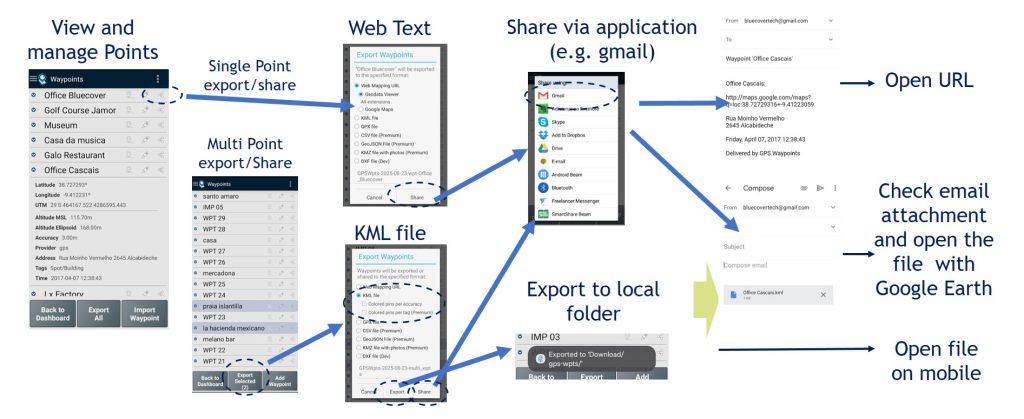
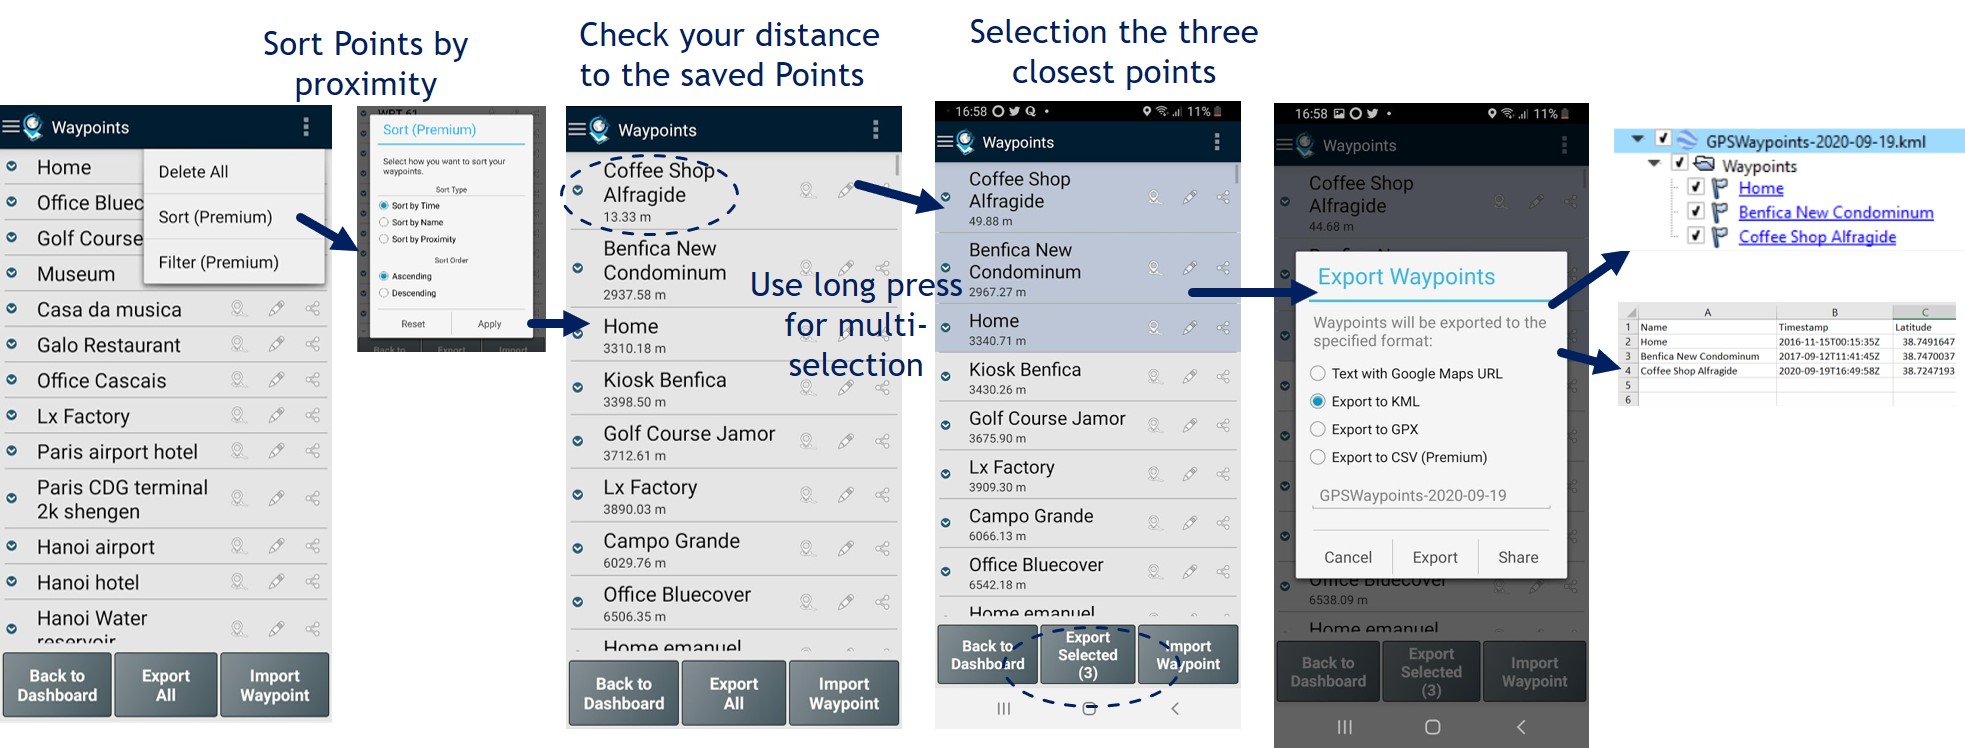
Sort and export the closest Points: Points can be sorted by proximity to identify the most relevant ones. Then, use the multi-selection feature by long-pressing the desired Points to export. Once the selection is complete, press the “Export Selected” button.
Waypoints navigation
Find a place from a saved Point: you can get directions to Points previously saved and available on your database. It could be useful in situations to go back to the starting point (for instance, when in tourism, you want typically to go back to your accommodation).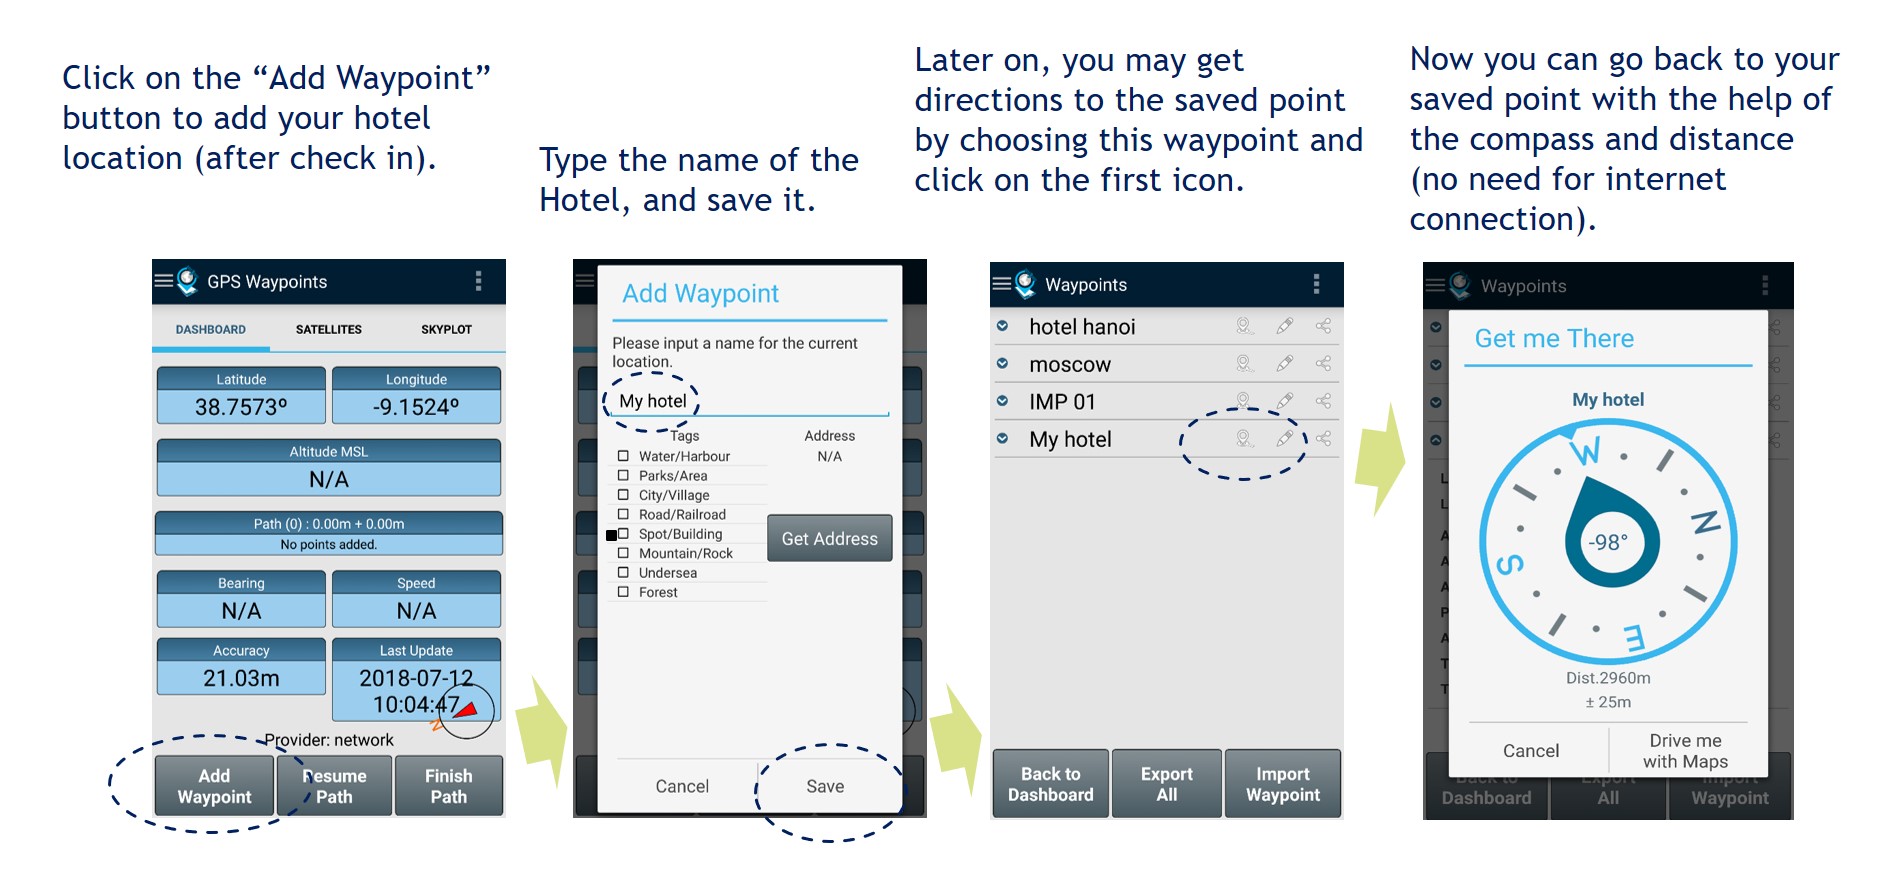 Find a place from a manually added Point: you can import waypoints to your database by searching for a Point-of-Interest or for an address. After confirming the search results with the coordinates of the place, you can save it as new waypoint and then check the directions to it.
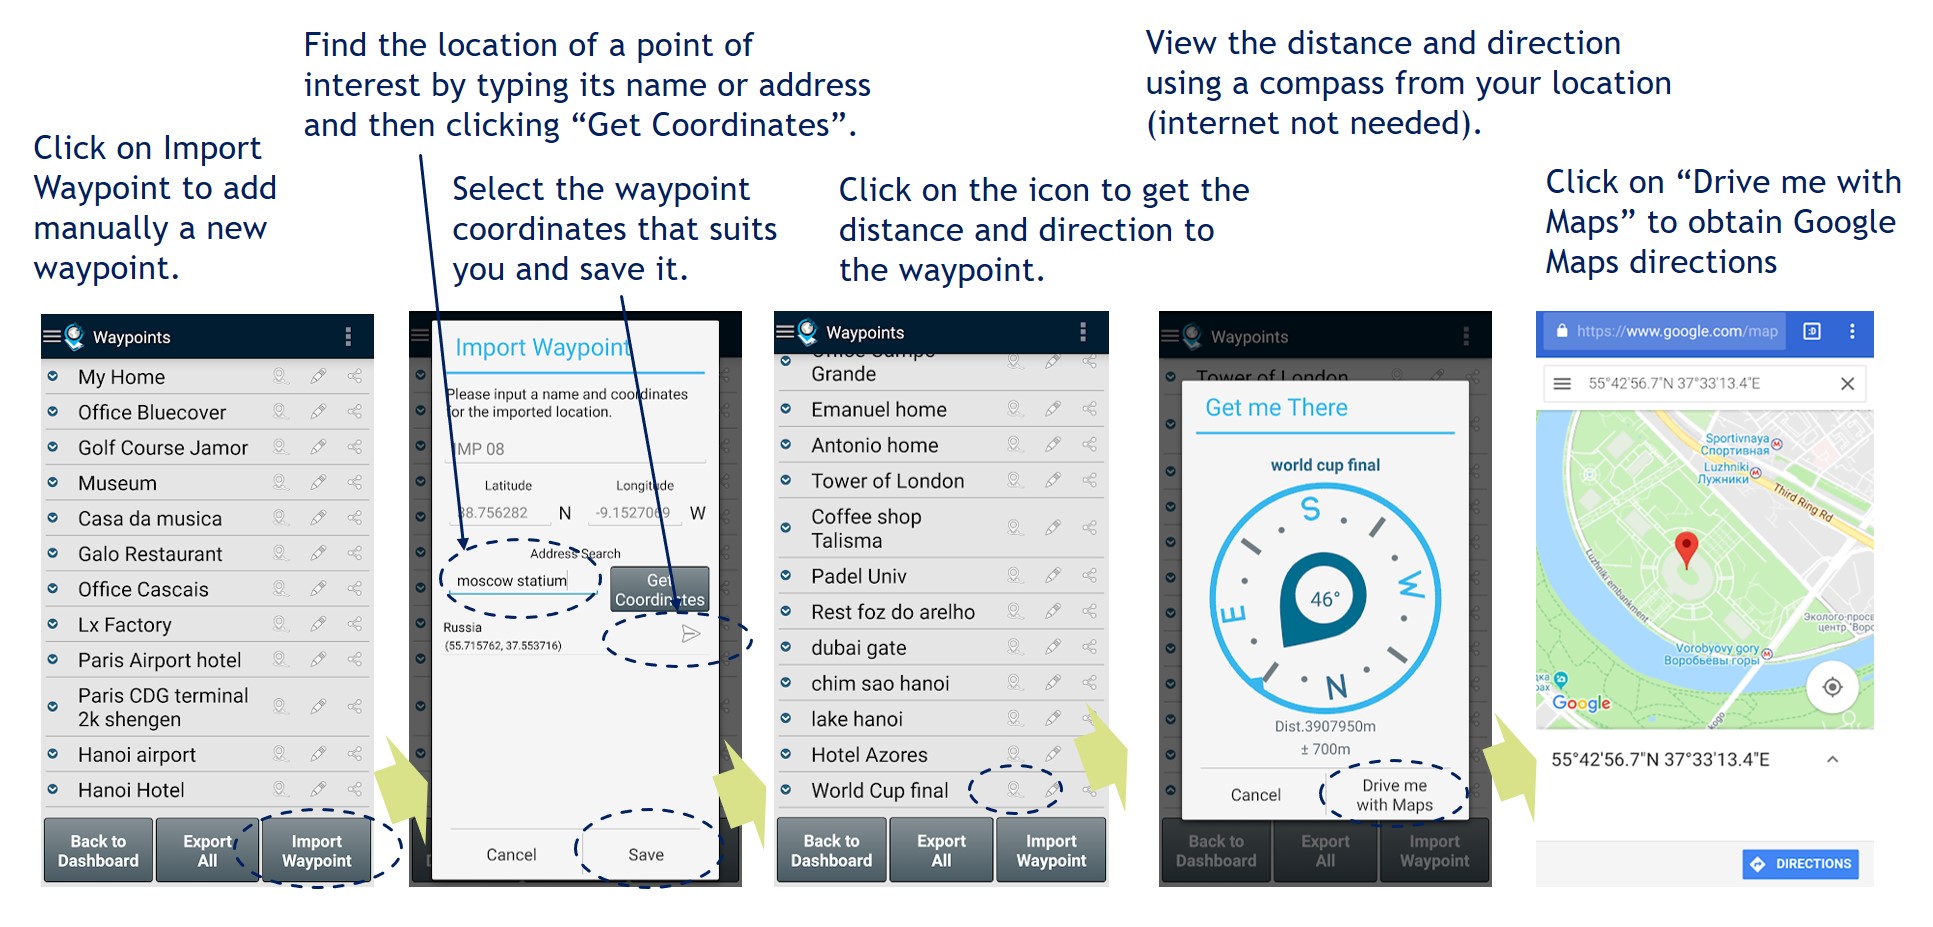
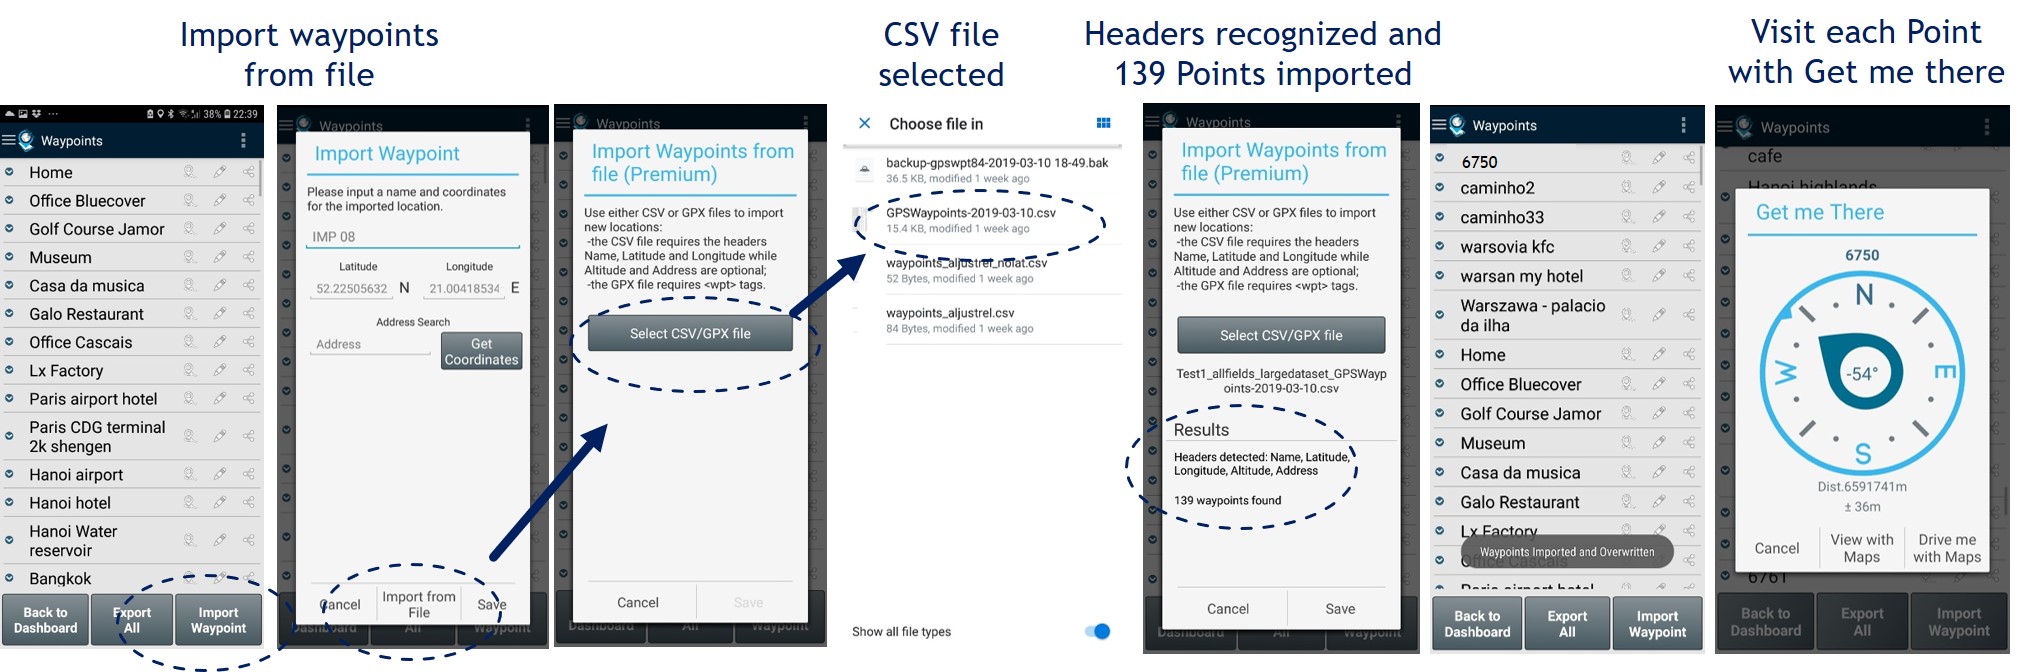
Field Check for insitu observation and validation: you can import multiple points from CSV or GPX file. Visit on the field each of the points imported with the “Get Me There” function and make observations or validation of the previous classification tags (for instance it could be used to validate maps derived from airborne or satellite imagery (Professional validation).
Paths and Areas surveying
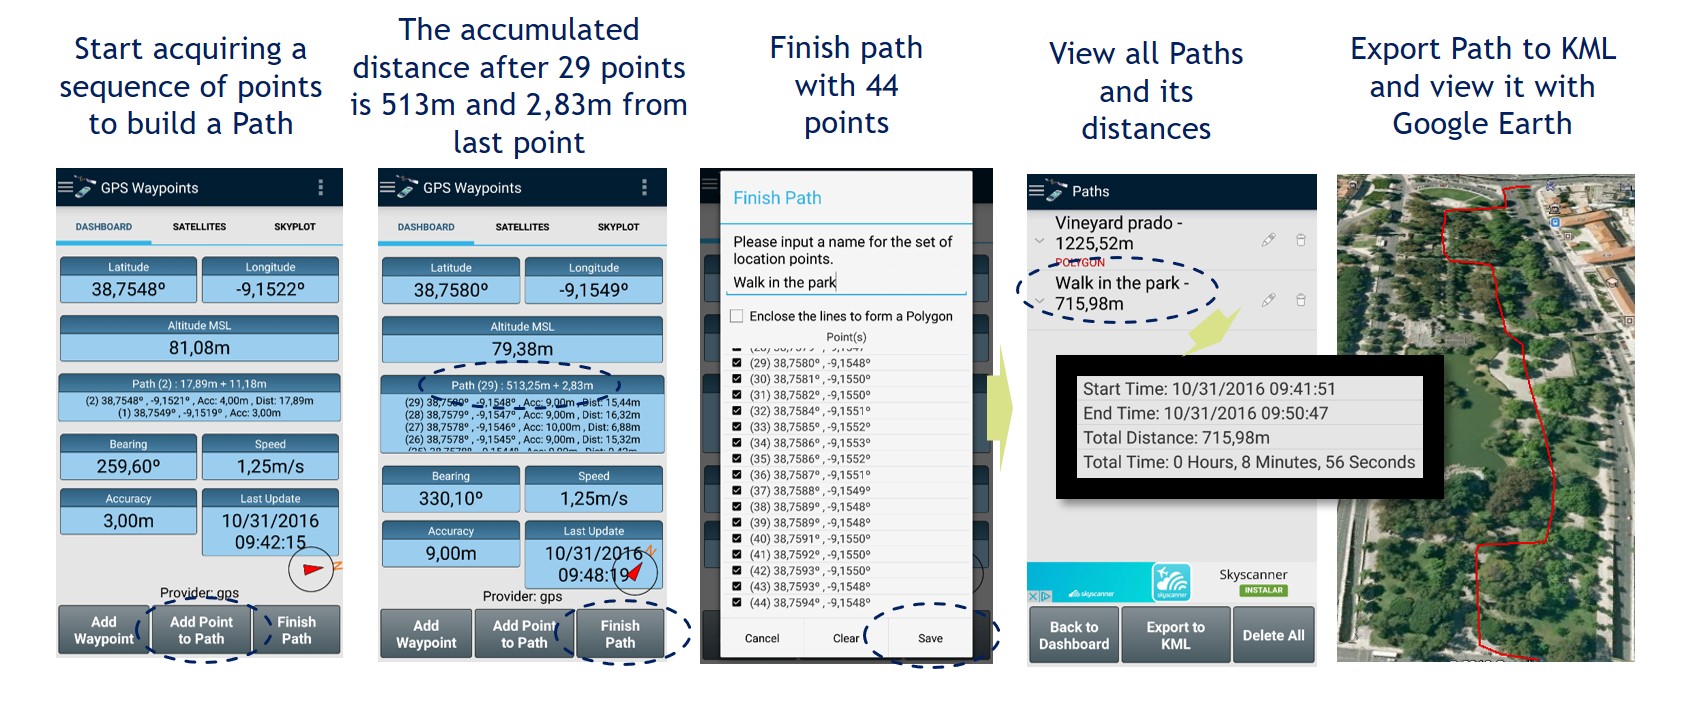
Surveying a Path from multi-point acquisition in the field (manual path trigger): a Path can be built from an ordered sequence of Points by manually triggering the acquisition of each point after checking the distance to the previous one. The resulting Track can be exported or used solely for distance measurement.
Areas surveying: allows building polygons of the land properties on the field and measures their perimeters and areas.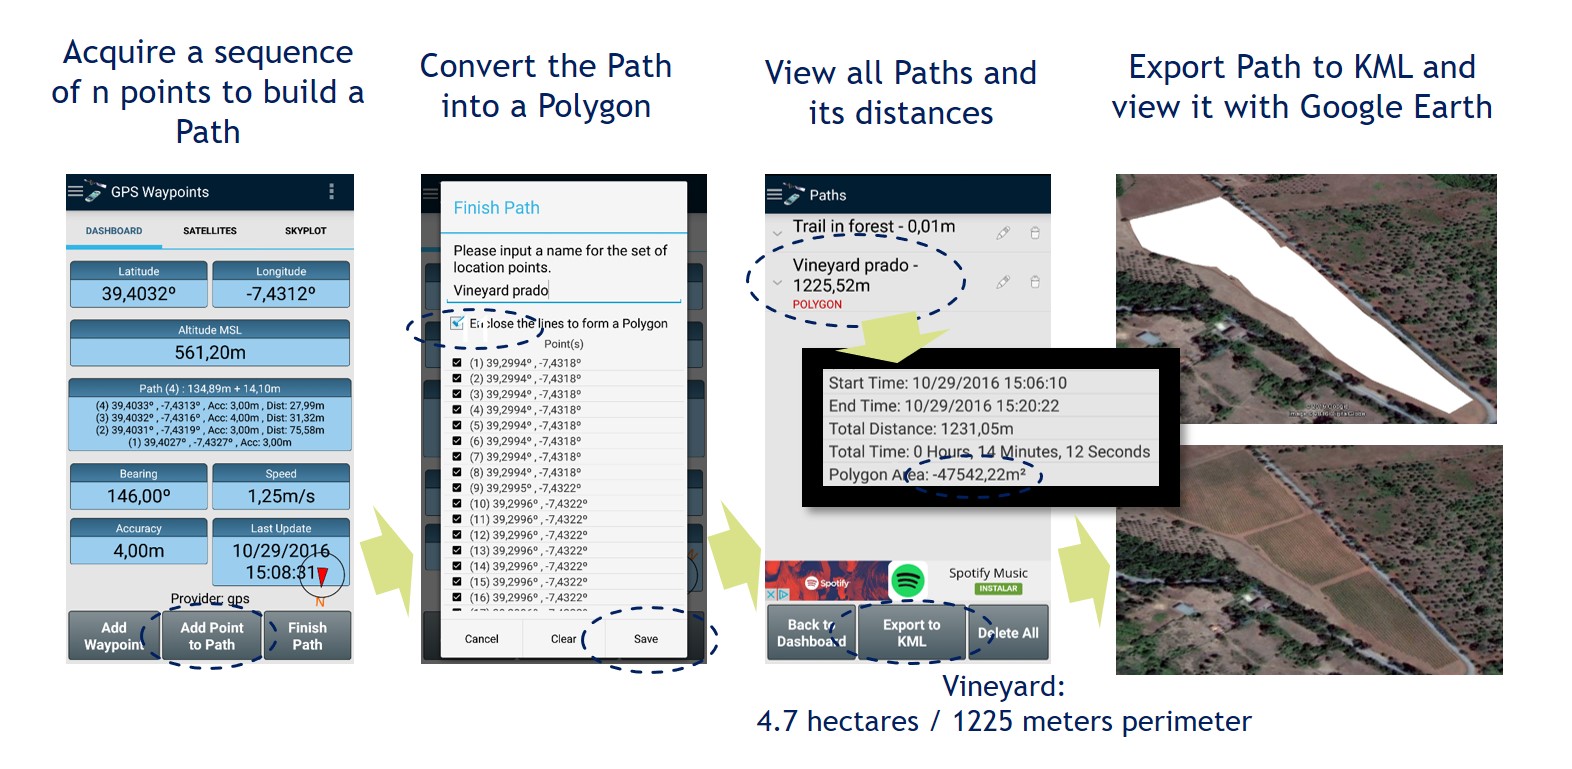 When better accuracy is needed (such as in cadastral surveying), an external receiver could be used.
Activity tracking trigger by time and distance (Auto Path): This feature allows tracking moving activities such as cycling, running, driving, or flying by automatically building an ordered sequence of Points (Path). Point acquisition can be triggered by both time and distance. The resulting Path enables the measurement of total distance, duration, and elevation profile of the activity. The exported result in GPX format can be loaded into sports and activity-tracking platforms. ![]()
Paths analysis
Analyze Paths in time with line charts: you need to select the paths by long pressing over the ones that you want to analyze and then tap on View Charts. You can select the features to be analyzed, zoom on x-axis or y-axis with two fingers or check specific feature values by clicking on the chart point. You can also swipe to next and previous chart and check charts in landscape.
Import Paths from waypoints: allows building a path from a set of Points, measuring distances between Points.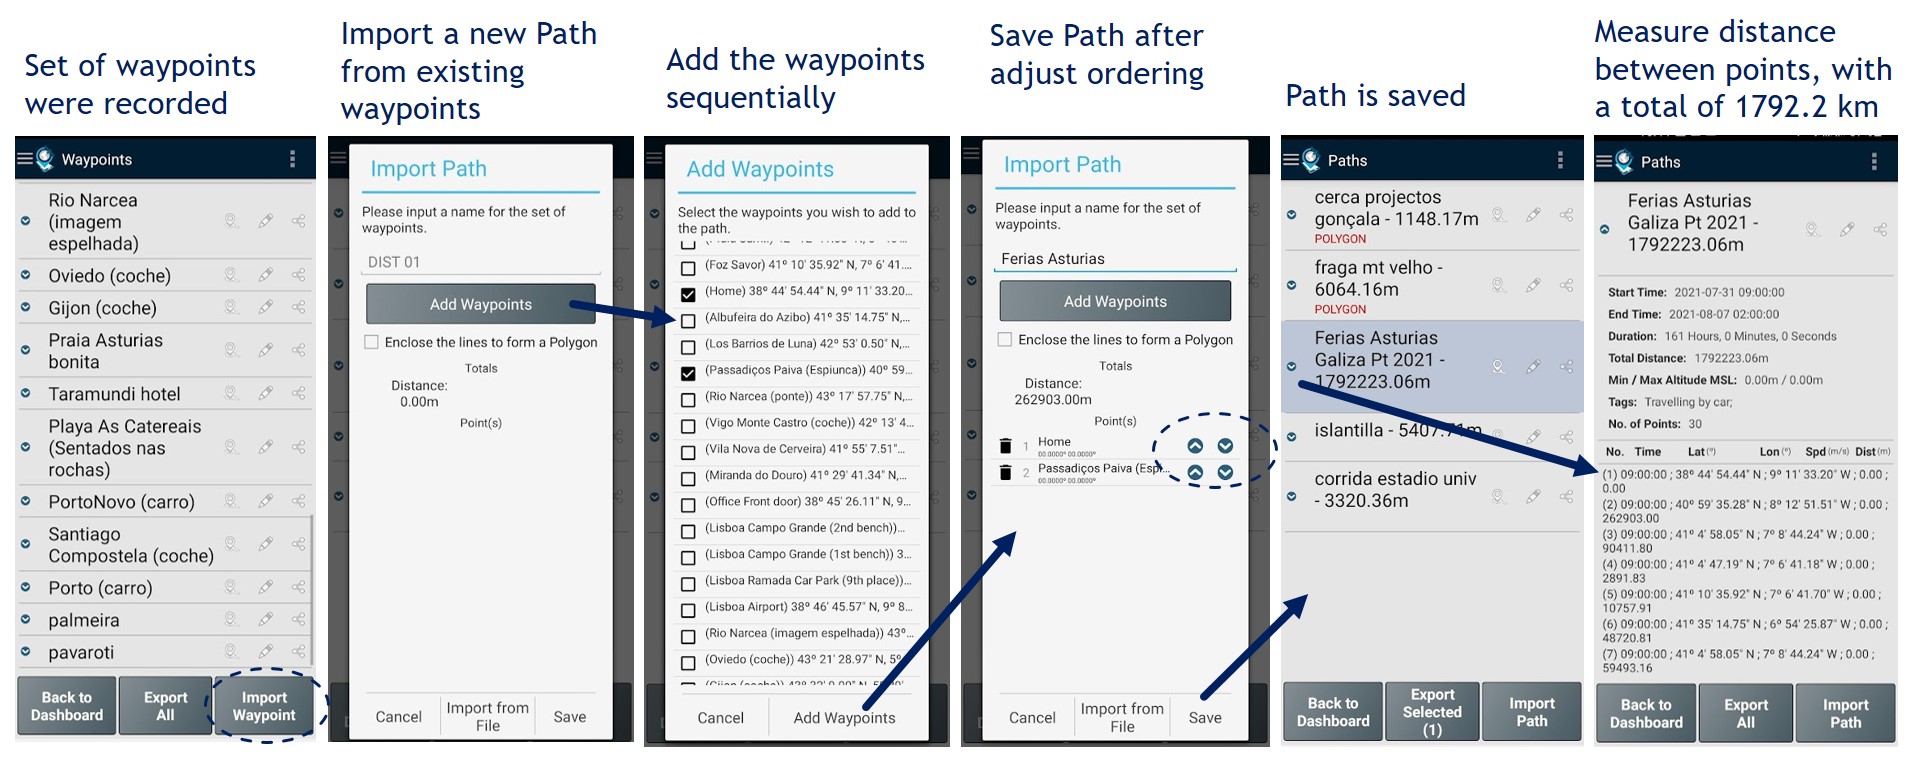
Paths navigation
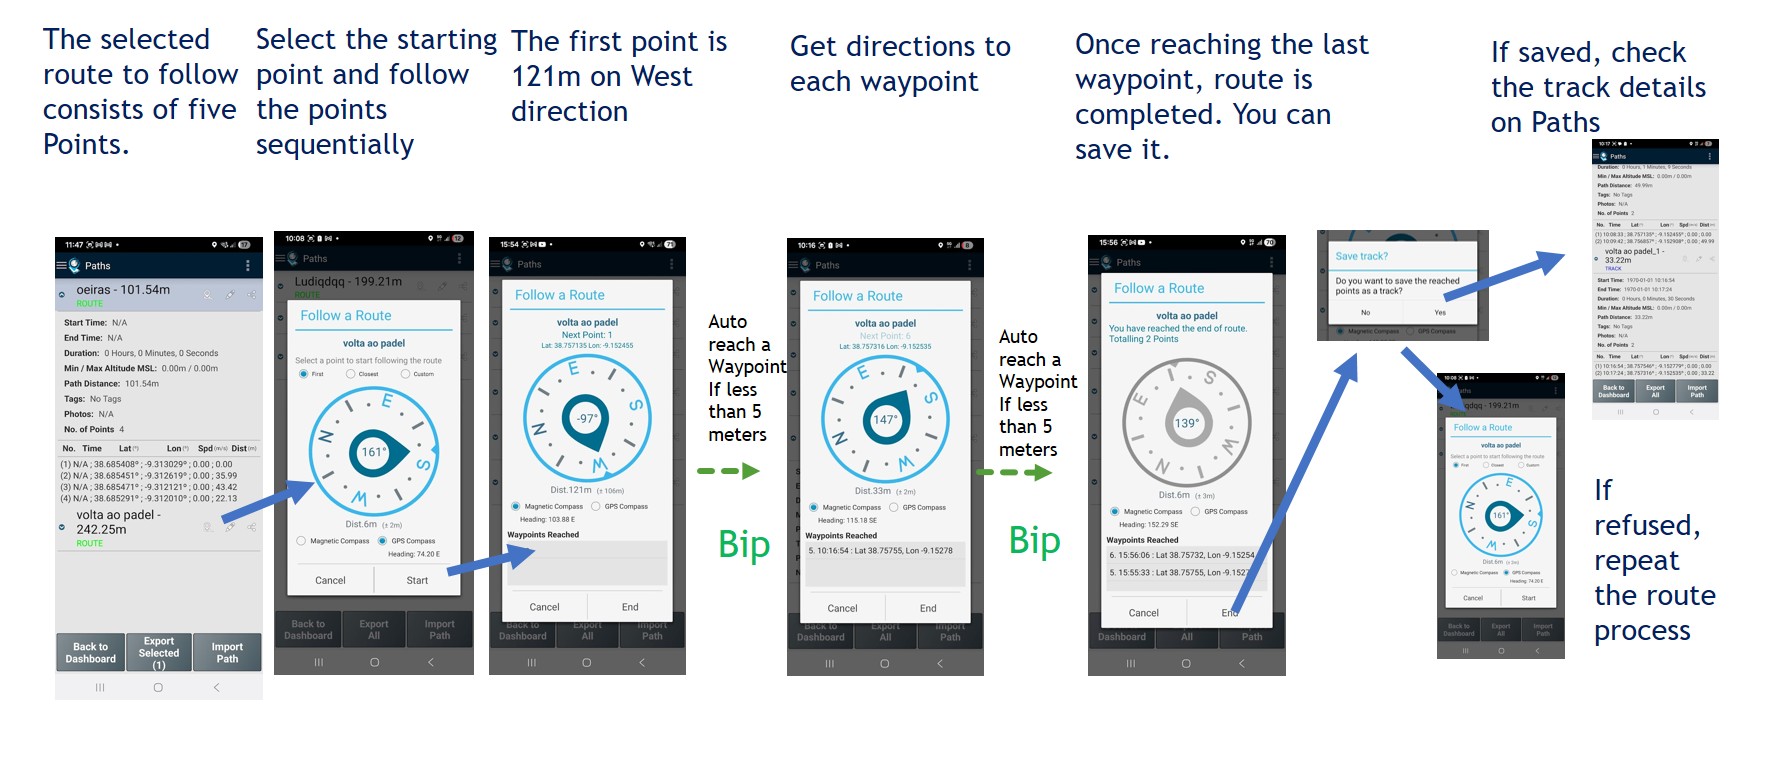
Follow a Route: This feature allows users to receive directions and follow a route defined by a sequence of Points. The user selects a starting Waypoint and receives directions to it. Once the target location is reached (within 5 meters), the next Waypoint is displayed, continuing until the final Waypoint is reached. If the route is saved, it also allows measuring the time spent between each Waypoint.